
Ankle carry has long been favored by law enforcement officers, security personnel, and civilians who want a discreet way to carry a firearm. It provides excellent concealment while allowing for a backup weapon that remains accessible even when seated or in tight spaces. The ankle pistol holster is specifically designed to secure the firearm comfortably around the lower leg while still enabling a quick draw in emergencies. However, because the ankle position is not the most natural draw location, regular practice is crucial to ensure you can deploy your weapon quickly and safely when needed.
Choosing The Right Ankle Pistol Holster For Training
Before you can practice effectively, selecting a suitable ankle holster is essential. Look for models that offer adjustable straps, a secure retention system, and padding for comfort. The holster should keep the firearm stable during movement, minimizing shifting or bouncing. Breathable materials can reduce irritation during extended wear, while reinforced stitching and quality fasteners increase longevity. Some designs include calf straps for additional support, which can be especially beneficial for heavier firearms.
Setting Up A Safe Practice Environment
Prioritize Safety First
Before any training session, verify that your firearm is unloaded and that there is no live ammunition in the training area. If possible, use a training gun or blue gun replica for initial practice. Establish a clear area free from distractions, bystanders, or obstacles that could cause tripping or accidental injury.
Wear The Holster As You Would In Real Situations
To build muscle memory, wear your ankle pistol holster exactly as you would in everyday carry scenarios. This includes the same positioning on your leg, any accompanying gear, and the type of footwear you typically use. Practicing in realistic conditions helps prepare you for real-world applications.
Practicing The Drawing Technique Step By Step
Step 1: Adopt The Correct Stance
When drawing from an ankle holster, stability is key. Start by placing your feet shoulder-width apart, slightly bending your knees to lower your center of gravity. This will give you balance and allow for smoother movement.
Step 2: Clear The Pant Leg
With your non-dominant hand, pull up your pant leg high enough to fully expose the holster. Avoid tugging too aggressively, as you want a controlled, consistent movement that won’t interfere with the draw.
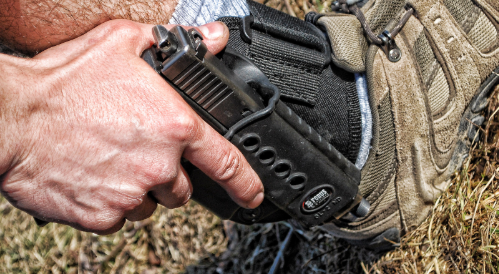
Step 3: Grip And Release The Firearm
With your dominant hand, establish a firm, full grip on the firearm while disengaging any retention devices on the ankle pistol holster. Ensure your finger stays off the trigger during this process to avoid negligent discharges.
Step 4: Present The Firearm
Bring the firearm up toward your torso in a smooth, controlled motion before extending it toward your target. This upward motion reduces the time your gun is low and out of your primary field of vision.
Building Speed And Consistency
Dry-Fire Drills
Once you are confident in your draw mechanics, begin timed dry-fire drills. Use a shot timer to track progress and gradually work on reducing draw time without sacrificing safety or accuracy.
Adding Movement To Practice
In real-life scenarios, you may need to draw while moving or from different positions such as sitting or kneeling. Incorporate these variations into your training to develop adaptability.
Avoiding Common Mistakes
A frequent mistake is failing to clear the pant leg adequately, resulting in a tangled draw. Another is adopting an unbalanced stance, which can slow your reaction time or cause a fall. Over-gripping or jerking the firearm can also lead to fumbles, so focus on smooth, deliberate motions.
Maintaining Your Ankle Pistol Holster
Regularly inspect your holster for signs of wear, such as fraying straps or loose stitching. A damaged holster can compromise retention and safety. Clean it according to the manufacturer’s instructions, especially if it accumulates dust, lint, or sweat from extended use.
Integrating The Practice Into Your Routine
To develop long-term proficiency, practice drawing from your ankle holster weekly. Even short, consistent training sessions can dramatically improve both speed and accuracy over time. Combine these sessions with general marksmanship and situational awareness drills to ensure a well-rounded skill set.
Conclusion
Mastering the draw from an ankle pistol holster requires patience, repetition, and a commitment to safety. By choosing the right holster, practicing in realistic scenarios, and refining your technique step-by-step, you can turn a concealed carry backup option into a reliable defensive tool. Remember, your goal is to draw confidently under pressure without compromising safety. Alongside practicing with ankle holsters, it’s equally important to ensure proper retention and handling when you holster pistols in other carry positions, so your firearm remains secure no matter the method of carry.